One of the major advantages of taking on the fitout of your building after install is that you have complete creative control over the look and function of the interior – and that includes your walls. Whether you’re creating a home office, workshop, creative studio, or accommodation, the right wall lining will influence the mood, usability, and overall feel of the space.
While plasterboard/gyprock has long been the go-to wall lining, it’s far from your only option.
In fact, there are several wall lining alternatives that can save you time, reduce costs, and inject personality into your space with unique style and texture. And more and more people are opting for something a little bit different!
Let’s take a closer look at some popular wall lining choices that could be perfect for your garden room, cabana, barn, or shed.
Things to Ask Yourself When Choosing Your Wall Lining
Before deciding on a wall lining option, there are some fundamental questions to first consider. The answers to these will determine which wall linings could work best and which might be best to avoid.
Ask yourself:
- What is your preferred style – modern, rustic, industrial, minimalist or luxe?
- How important is ease and speed of installation?
- Will your space need additional insulation or soundproofing?
- Do you want your walls to serve a practical purpose, such as storage or display?
- What’s your budget for materials and labour?
- Will the wall lining need to withstand moisture or wear and tear?
With this established, it’s time to look at some of the alternative wall lining options.
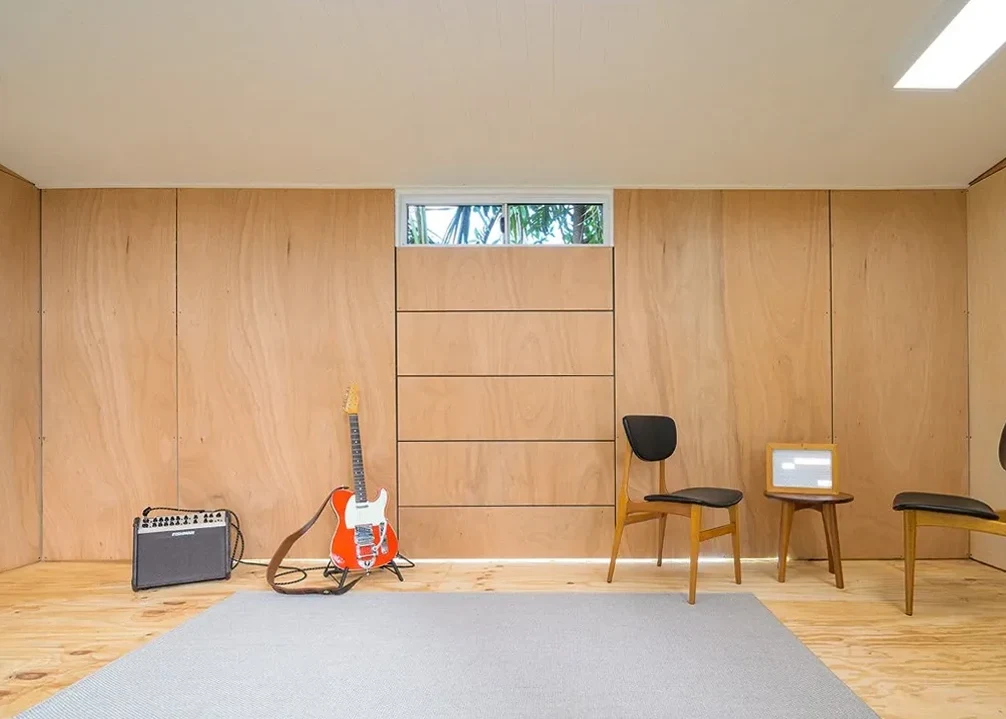
1. Smooth Ply Lining – Sleek, Simple and Stylish
Not the rough, rustic finish that you might be imagining, smooth ply offers a refined, sophisticated finish that’s both cost-effective and easy to install. It’s a wall lining that adapts to a range of styles – from modern minimalist to warm Scandi – with the flexibility to be painted or stained to suit your decor preferences.
| Great for | Less suited to |
|---|---|
| Minimalist interiors and modern studios | High-traffic areas prone to heavy impact |
| Quick DIY projects | Spaces with consistent high moisture, unless properly treated or specifically marine grade |
| When flexibility to paint or stain is required |
| Pros | Cons |
|---|---|
| Easy to paint or stain – or leave it raw | Can dent or scratch more easily than plasterboard |
| Quick to install, saving labour costs | Requires sealing to protect against moisture in wet areas |
| Budget-friendly without sacrificing style | Visible joins need planning to achieve a seamless look |
Smooth Ply Design Inspiration
The Scandinavian Studio: Paint smooth ply in soft whites or pale greys, then add floating shelves in natural timber. The contrast creates a perfect backdrop for plants and books.
Mid-Century Modern: Leave smooth ply in its natural state or apply a clear matte finish to showcase the wood grain. Create shadow lines by installing thin battens or routing beading strips at panel joints. Pair with walnut timber accents and geometric lighting fixtures.
Industrial Chic: Leave ply unpainted but sealed, pairing it with black metal fixtures and Edison bulb lighting for an urban loft vibe.
Colour Blocking: Use different coloured paints to create geometric patterns or accent walls that add visual interest without texture. Plan your panel joins carefully and use them as a built-in grid that adds rhythm and structure.
Tips for Working with Smooth Ply
- Choose marine-grade or exterior-grade ply for moisture-prone areas to ensure longevity
- Sand edges and apply a primer before painting for a flawless finish
- Plan your sheet layout precisely to reduce wastage and to create even, deliberate shadow lines or minimise visible joins
- Use decorative battens or beading to hide or emphasise joins, enhancing the aesthetic
- Consider tongue-and-groove ply or routered grooves for seamless or enhanced detailing, depending on your desired finish
2. Board and Batten – Rustic Charm with Custom Flair
For a cool, rustic cabin vibe, board and batten is a top pick! It adds rich texture and visual interest to your walls, instantly creating a cosy, welcoming atmosphere.
Board and batten is not only visually appealing but also versatile. You can customise the width of the boards and battens to suit your style, and it can be painted or stained to complement your decor. Installation is straightforward, and the results can dramatically transform a space with its warm, handcrafted feel.
| Great for | Less suited for |
|---|---|
| Rustic country-style interiors | High-moisture rooms, unless properly sealed |
| Traditional cabins and farmhouse designs | Ultra-modern or minimalist spaces |
| Accent walls and cosy interiors | Where smooth surfaces are preferred or needed |
| Pros | Cons |
|---|---|
| Adds deep texture and refined, yet rustic, character | Requires precise installation for plumb lines and even spacing |
| Board and batten widths can be customised for unique looks | Higher material cost due to extra timber components |
| Can be painted or stained to suit any style | Can be more tricky to install around electrical fittings and switches, requiring careful cuts |
| Fairly straightforward, DIY-friendly installation |
Board and Batten Design Inspiration
The Modern Farmhouse: Use wide boards (around 150mm) with narrow battens (25mm), painted crisp white for a timeless modern farmhouse vibe.
Cabin Cosy: For an authentic wood cabin feel, consider installing horizontally. Apply natural timber stain and layer with warm lighting and textured textiles.
Colour Play: Paint boards one colour and battens another for a subtle two-tone effect that adds sophistication and depth.
Height Tricks: Install board and batten only on the lower half of walls to add interest while keeping costs down and allowing for another wall finish above.
Tips for Working with Board and Batten
- Install boards first, then fix battens over the joins for a cleaner finish
- Use a finishing or brad nail gun for neat, consistent fixing, ensuring nails are recessed and filled if a smooth painted finish is planned
- Pre-cut all battens for uniform length and easy, efficient installation
- If painting, consider using MDF battens, as they are often straighter and a more budget-friendly option than solid timber
- Plan electrical rough-ins carefully to avoid cutting through multiple layers of board and batten, which can be time-consuming
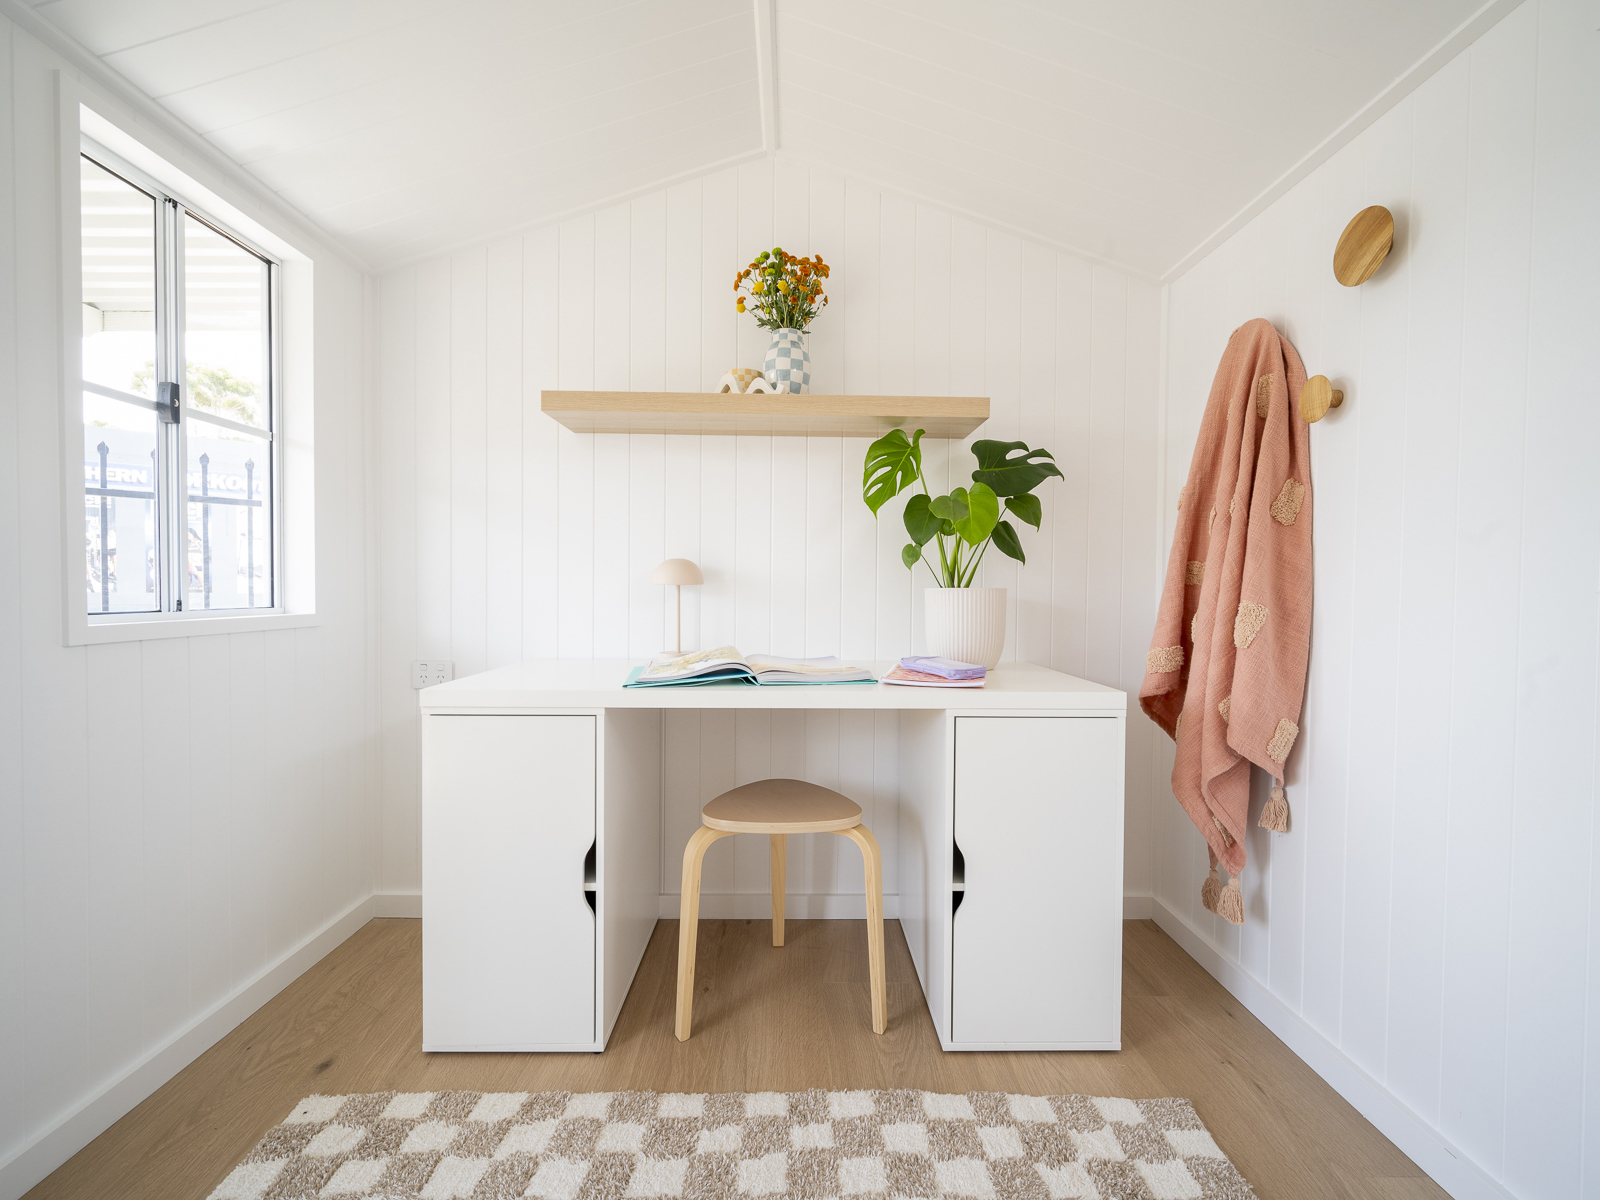
3. Easycraft Wall Panels – Ready to Install Aussie Classic
A blend of beauty and convenience, Easycraft panels are a long-standing favourite for modern interiors. With a wide range of decorative profiles, they’re pre-primed and often pre-painted in a variety of colours, ready to be fixed straight to studs for an instant sleek finish. While Easycraft is the well-known Aussie brand name, there are now plenty of alternatives readily available from Bunnings and other building suppliers – with VJ panels still a top choice.
Whether you choose to tackle the installation yourself or enlist the help of a local handyman, Easycraft or VJ panels save on time and deliver a sleek, flawless finish with minimal effort. Plus, their durability means you get great value for money.
| Great for | Less suited to |
|---|---|
| Fast fitouts | Very high-impact areas where significant damage is a risk |
| Workspaces, studios, home offices, granny flats | Raw and rustic designs |
| Modern interiors with a clean-lined finish | Interiors requiring warm, authentic character |
| Pros | Cons |
|---|---|
| Pre-primed and often pre-painted for faster installation | Less bespoke than raw materials |
| Durable and easy to clean – great for high-use areas | Panel joins may be visible unless meticulously finished wth paintable ‘No More Gaps‘ |
| Wide range of profiles, colours, and sizes available | Some specific profiles may date over time as trends change |
| Can be repainted for a fresh, new look if your style evolves | Harder to repair if damaged – may require panel replacement |
| Consistent, factory-applied finish with minimal on-site prep |
Easycraft Panels Design Inspiration
Clean and Bright: Choose white vertical VJ or shiplap panels with minimal trim for a fresh, gallery-like feel that pairs beautifully with natural timber floors and leafy indoor plants.
Workshop Ready: Easycraft is ideal for garden sheds or hobby studios where you want wipeable walls and fast installation. Pair with stainless steel fixtures and pale plywood shelves for a tidy, functional finish.
Feature Wall: Mix profiles or colours to create feature walls or accents. Try pairing raised and flat profiles in complementary tones to add subtle depth and interest.
Cool and Calm: Create a welcoming, distraction-free workspace by using panels in neutral tones like sage, clay, or charcoal that bring subtle texture and intentional style to your home office. Complete the look with open shelving and warm downlights for a polished, professional finish.
Tips for Working with Easycraft
- Store panels flat and allow them to acclimatise to the room’s temperature and humidity for at least 48 hours before installation to prevent warping
- Use construction adhesive plus screws for an ultra-flat finish, ensuring maximum panel adhesion
- Pre-drill screw holes, especially near edges, to prevent panel cracking and ensure a clean fastening
- Plan panel layout to avoid narrow slivers at corners or ceilings, which can look awkward and are harder to install
- After installation, colour-match silicone along joins, or caulk and paint them, to hide any slight gaps
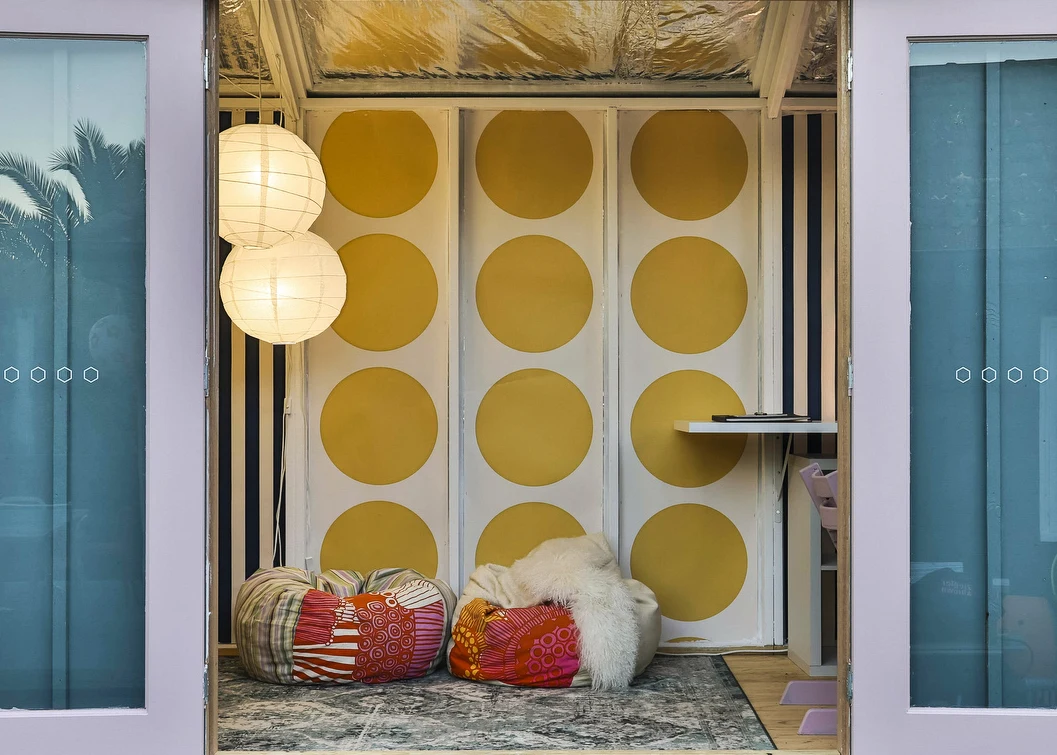
4. Feature Fabric Lining – Texture and Luxury in One
Looking to soften your space or add a luxe design detail? Fabric wall lining brings instant warmth, depth, and a custom, high-end finish. Whether you use it on a full wall or as a feature behind a bed or seating area, it offers a unique mix of texture, colour, and acoustic benefits.
| Great for | Less suited to |
|---|---|
| Bedrooms, lounges and media rooms | Humid zones and wet areas |
| Spaces requiring acoustic treatment | Areas regularly accessed by pets or children |
| Adding a touch of luxury or a statement feature wall | High traffic spaces where scuffs or tears may occur |
| Pros | Cons |
|---|---|
| Adds softness, texture, visual depth and unique aesthetic | Labour-intensive to install, often requiring professional upholstery skills or careful DIY |
| Great sound absorbing and acoustic qualities | Can be difficult to clean or repair, and may fade or stain |
| Fully customisable – your choice of fabric allows for endless design possibilities | Potentially higher cost if using premium upholstery fabrics |

Fabric Wall Lining Design Inspiration
The Luxe Bedroom: Choose velvet or linen-look fabric in deep navy, olive, or aubergine tones for a luxe hotel vibe. Install behind the bed as a soft, upholstered headboard that stretches wall to wall.
Cultural Escape: Use fabric to evoke a specific destination or theme. Think Moroccan-style prints in rich colours with brass accents, Japanese minimalism with natural linens and warm timber tones, or colourful Indian textiles layered for a boho feel.
Textile Contrast: Mix and match panels in tonal shades or alternate textures (e.g., boucle and linen) to create a soft, layered look with subtle visual interest.
Garden Retreat: Use natural fibres like hemp or linen in calming earth tones to bring the outdoors in. Fabric-lined walls soften the acoustics and add warmth, creating a serene space perfect for reading, meditation, or creative hobbies.
Tips for Working with Fabric Lining
- Use MDF backers to create a sturdy, flat surface for fabric attachment and clean edges
- Consider adding acoustic foam or batting underneath for enhanced sound absorption and insulation
- Use fabric protector spray (e.g., Scotchgard) to guard against stains and make cleaning easier
- Choose fade-resistant textiles for sun-exposed areas
- Consider Velcro or track-mounted panels to allow easy removal for cleaning or updating the look
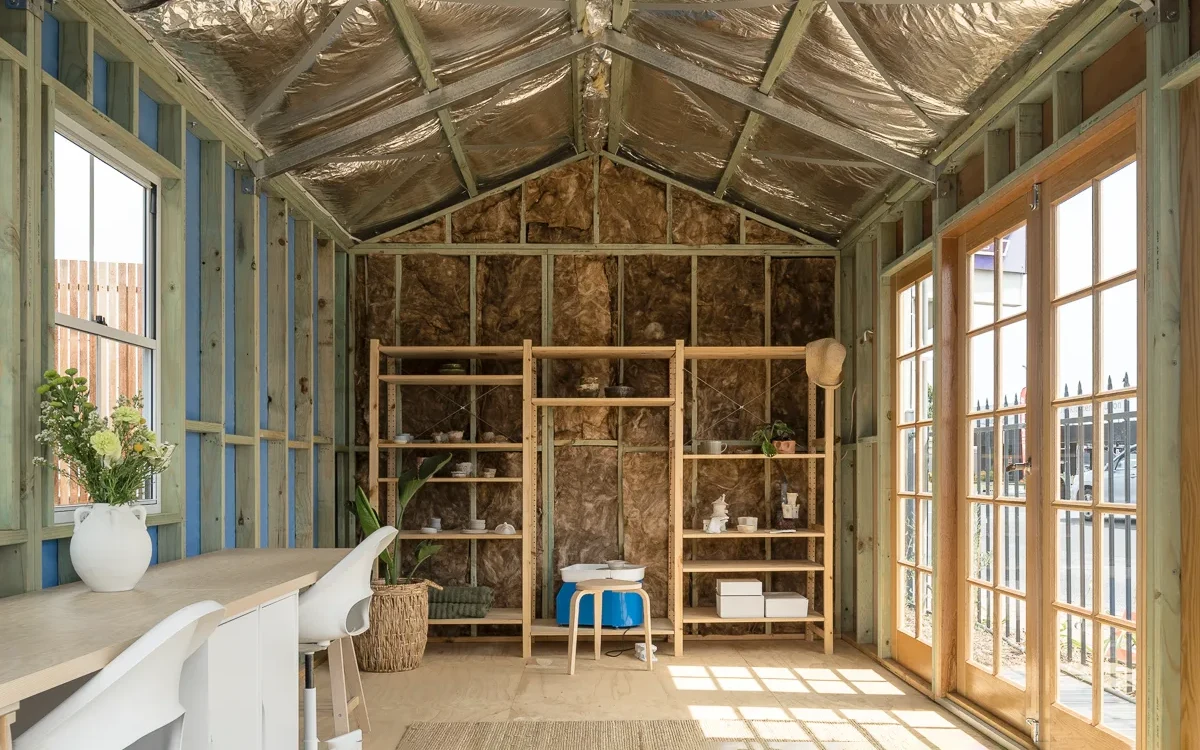
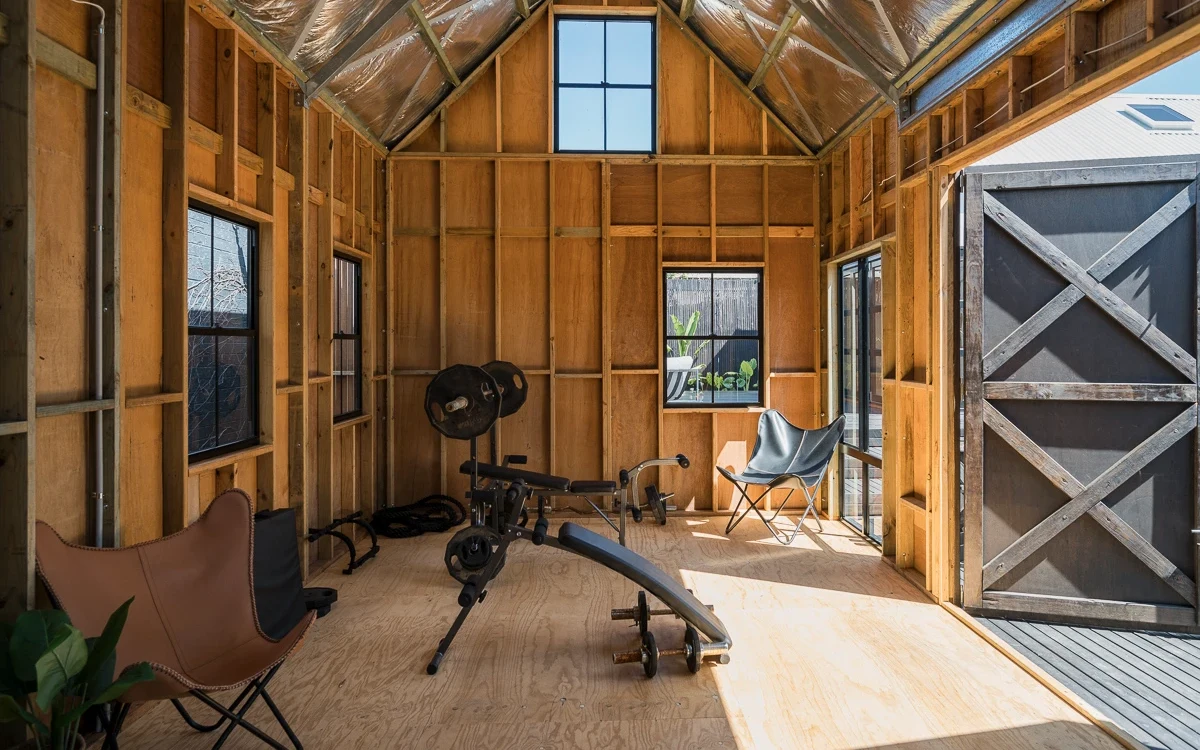
5. Raw / Industrial Look — Bold, Budget, and Bare
For a striking and cost-effective design, consider leaving walls unlined – a choice that’s particularly popular with artists and those drawn to industrial aesthetics. This approach not only saves time and money but can also create a bold, raw look that adds character to your space.
The natural thermal properties of our external claddings, combined with the insulation batts included in the roof, ensure that your cabana remains comfortable despite the unlined walls. It’s a super cheap yet stylish option that allows you to embrace an industrial feel while maintaining a cosy and functional environment.
| Great for | Less suited to |
|---|---|
| Creative studios, sheds and workshops | Extreme climate areas, unless insulation applied |
| Achieving a bold, stripped-back style that embraces imperfections and industrial aesthetics | Living or sleeping spaces where comfort is a priority |
| High traffic, high impact, high activity areas | Spaces requiring a refined finish |
| Pros | Cons |
|---|---|
| Minimal cost and labour involved | Less soundproofing and insulation, potentially more noise transfer and less stable temperatures |
| Emphasises structure and craftsmanship | Can be harder to clean and dust may accumulate easily |
| Practical, functional and durable |
Raw/Industrial Design Inspiration
Artist Chic: Leave framing, sarking, and plywood flooring exposed for a raw, creative space. Add simple, modern furnishings with timber accents to complete the look.
Workshop Rugged: Showcase steel roof trusses and timber framing with minimal clutter and durable workbenches. Use wall-mounted storage or the timber framing itself to maximise functionality.
Modern Rustic: Pair raw walls with warm timber floors and soft textiles like rugs and throws to balance industrial edge with cosy comfort.
Refined Roughness: Incorporate sleek fixtures and fittings, paint trusses, stain timber framing, or partially line sections to elevate the raw aesthetic into a more refined, sophisticated space.
Tips for Leaving Walls Unlined
- Apply clear timber sealants or oils to protect or enhance exposed framing without losing natural texture
- Use rugs, soft furnishings and window treatments to improve acoustics, compensating for the lack of sound-dampening wall linings
- Consider exposed conduit or pipework as part of the design aesthetic, embracing the industrial feel
- Plan lighting to highlight structural features and avoid harsh shadows that can make the space feel unfinished, rather than intentionally raw

6. Practical Pegboards – Organised Walls for Work and Play
Pegboards aren’t just for garages anymore. Used as wall lining in workshops, hobby rooms, or studios, they keep tools and supplies organised and within easy reach. Customisable pegboards can be painted or finished to suit your decor, maintaining a tidy and functional space.
Available in materials from perforated hardboard to sleek metal, pegboards add texture and versatility. Installation is simple, and their modular design lets you rearrange hooks and shelves as your needs evolve, providing ultimate flexibility.
Whether you’re a DIY enthusiast or a professional craftsman, pegboards transform your space into a streamlined, efficient area that supports your projects.
| Great for | Less suited to |
|---|---|
| Workshops and tool or garden sheds | Living spaces or formal areas |
| Hobby rooms and craft spaces | Areas with extreme climates |
| Studios needing functional storage and accessible equipment | Spaces requiring a tidy, polished finish or interior |
| Pros | Cons |
|---|---|
| Cost-effective and easy to install | Limited aesthetic appeal – can appear cluttered and overused unless well organised |
| Keeps tools and materials visible and within easy reach | Wall panel or insulation may show through the holes |
| Can be painted or stained to complement your decor | Minimal sound dampening |
| Adds a subtle working or craft-inspired atmosphere |
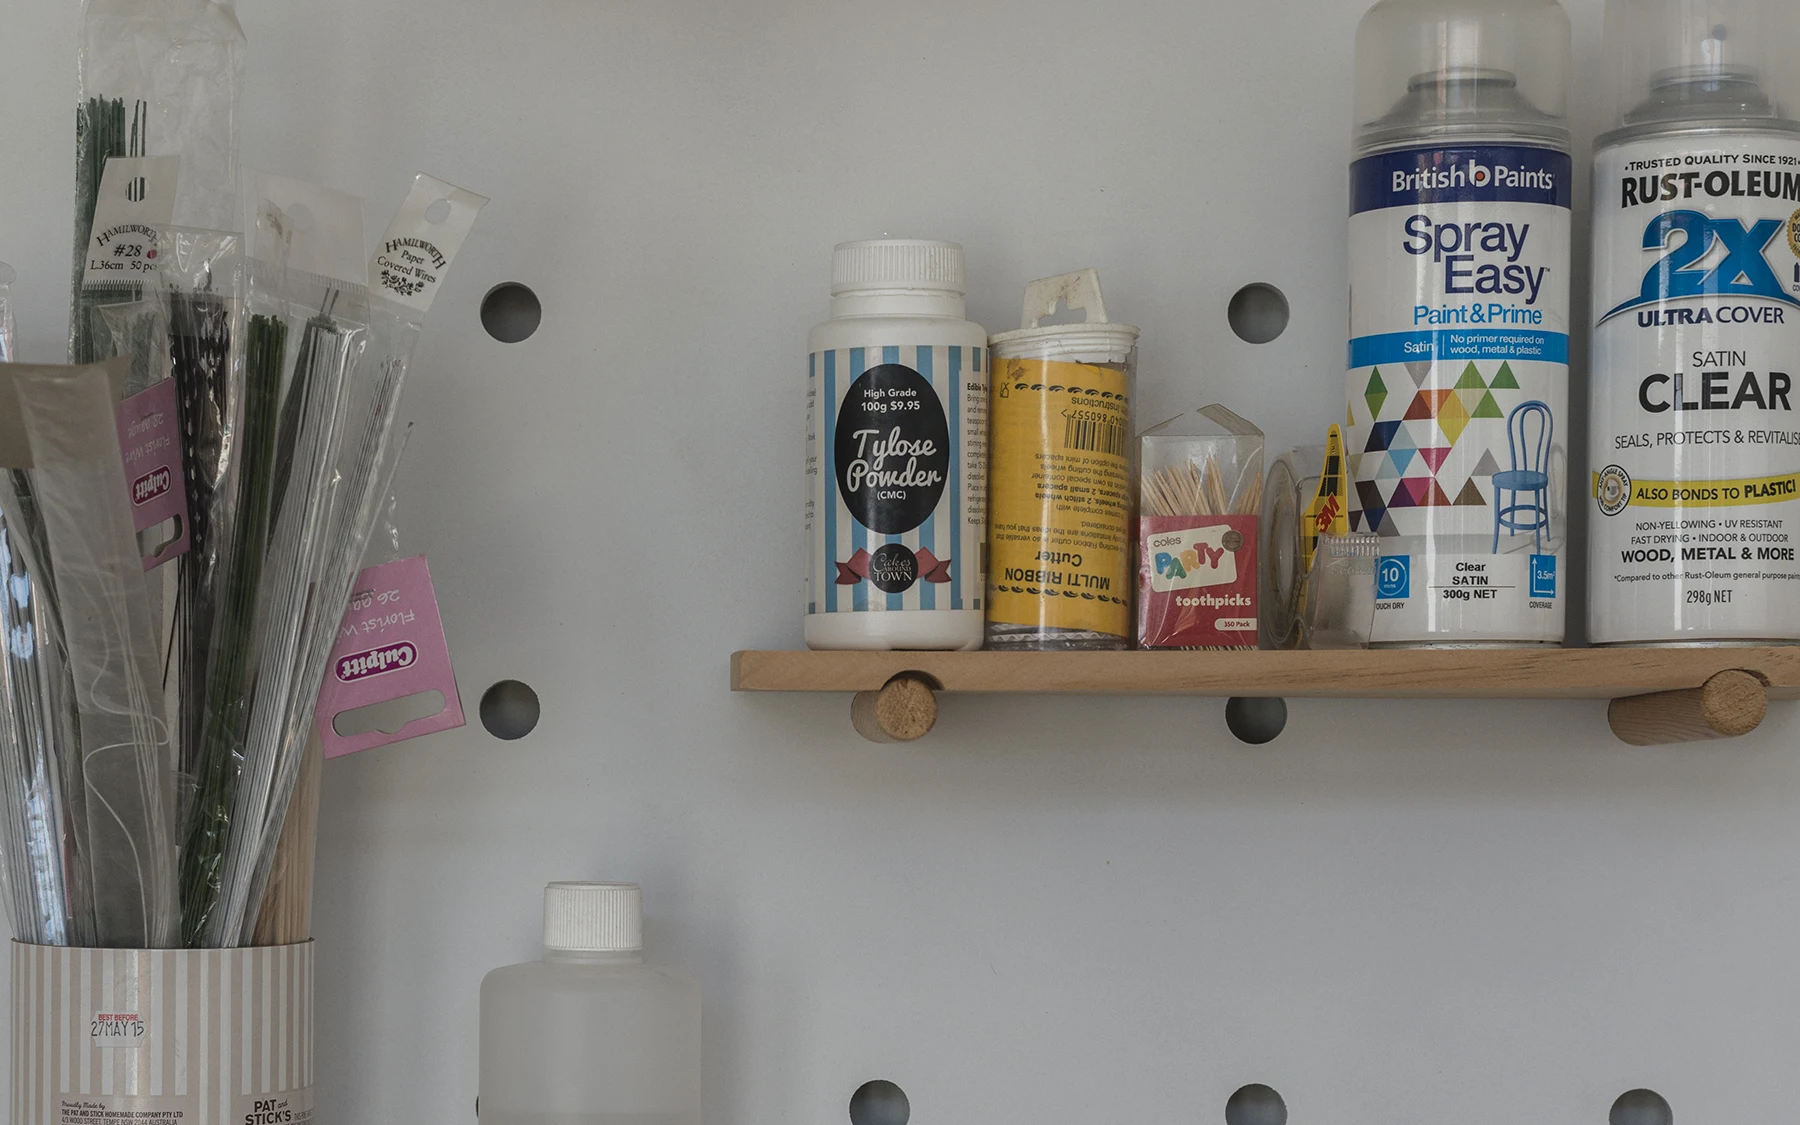
Pegboard Design Inspiration
Creative Centre: Paint pegboards in bold colours to create a vibrant backdrop for art supplies, brushes, and tools – perfect for craft studios or makerspaces.
Workshop Wonder: Combine natural timber pegboards with metal hooks and shelves for an industrial-rustic vibe in workshops.
Garden Glory: Use pegboard lining in garden or potting sheds to hang tools, pots, and planters for easy access and effective organisation.
Tips for Working with Pegboard Lining
- Fix pegboards securely to studs for sturdy support, especially if heavy items will be hung
- Consider hook depth needed behind the pegboard when installing
- Use a variety of matching hooks, baskets, and shelves to maximise storage versatility while maintaining uniformity
- Combine pegboards with timber trim for a polished finish
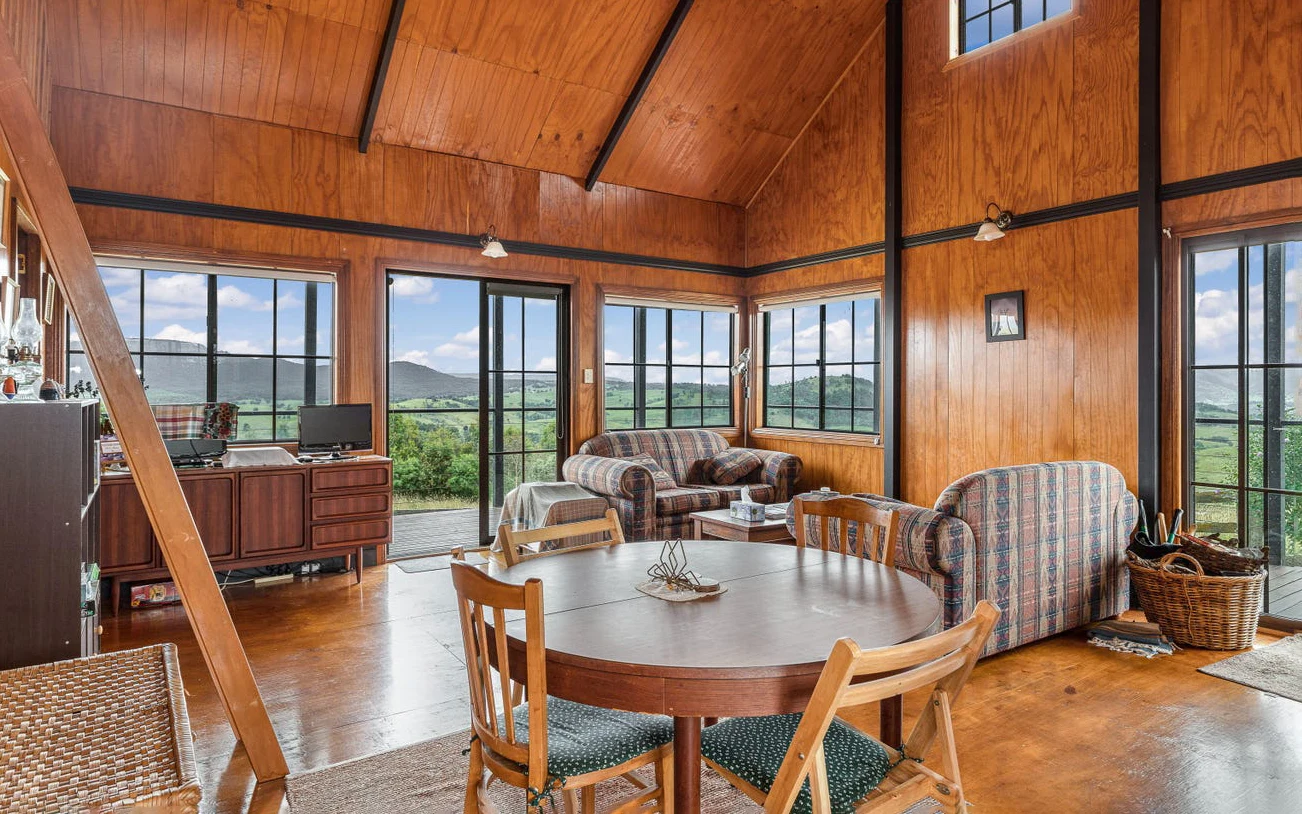
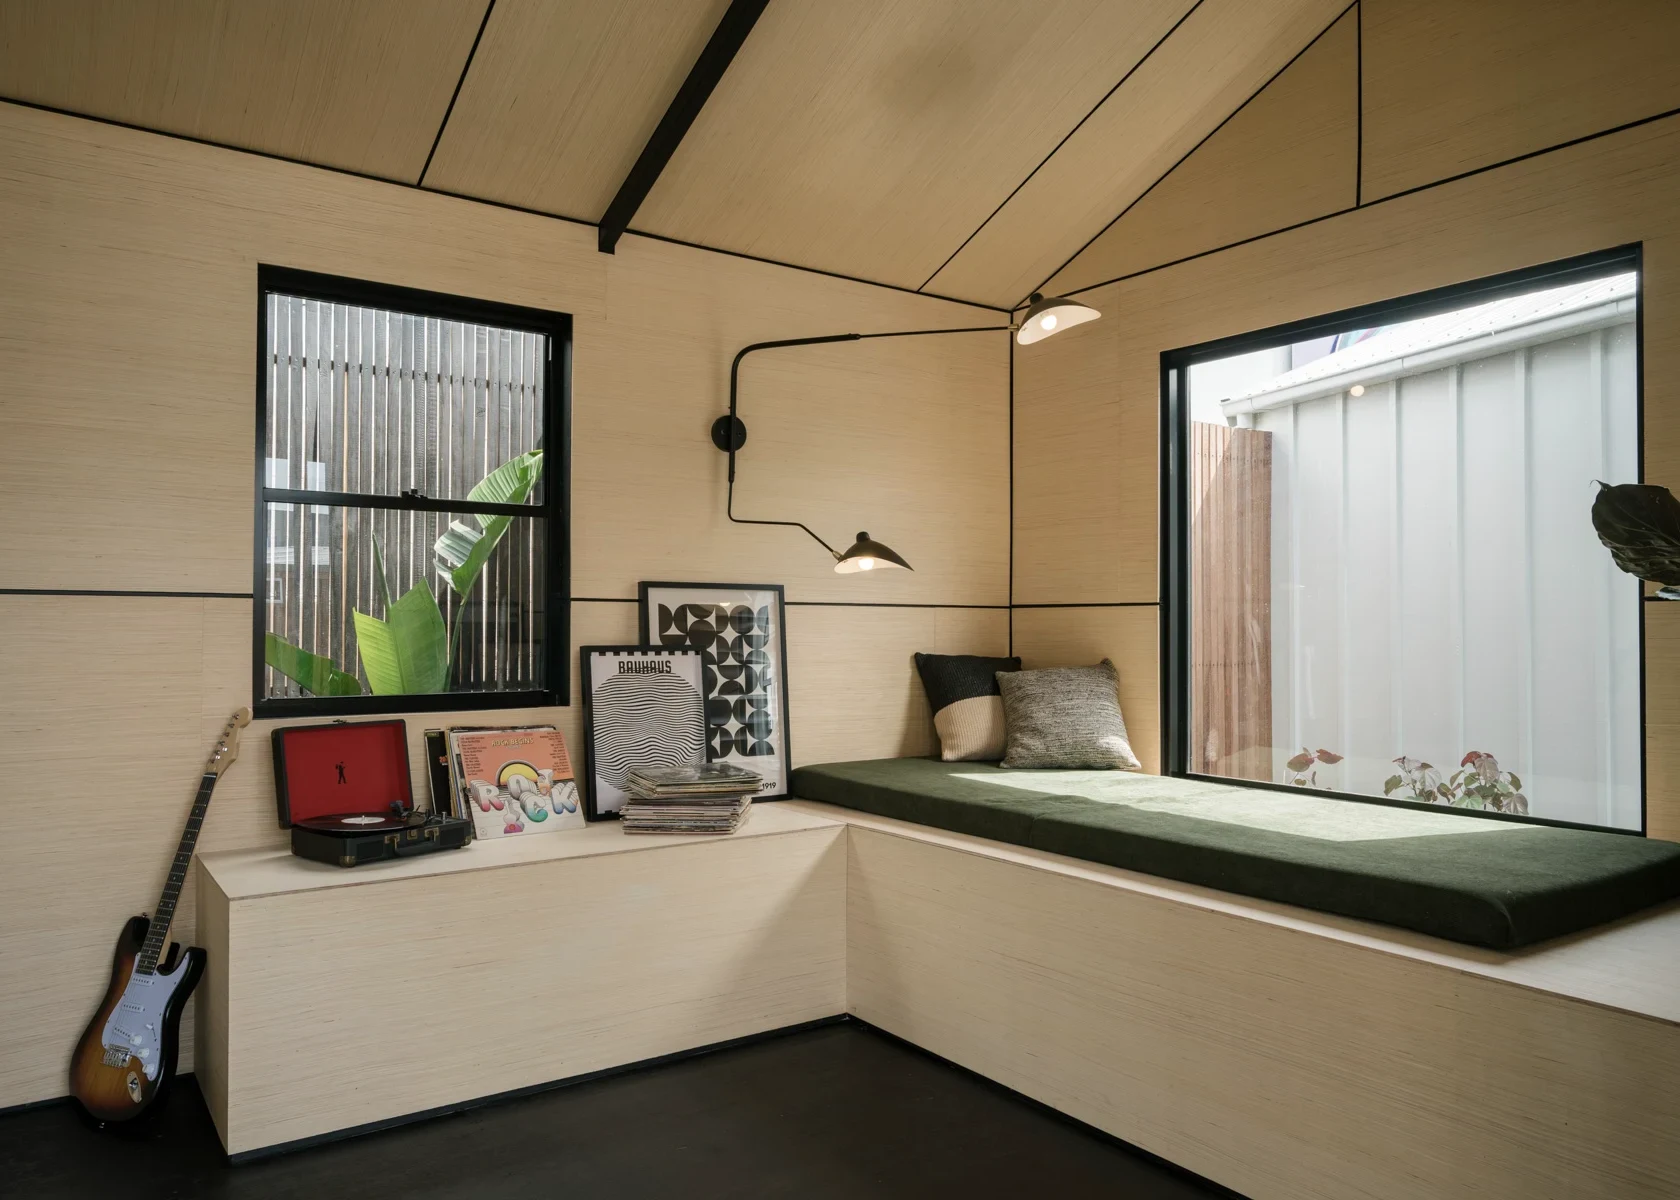
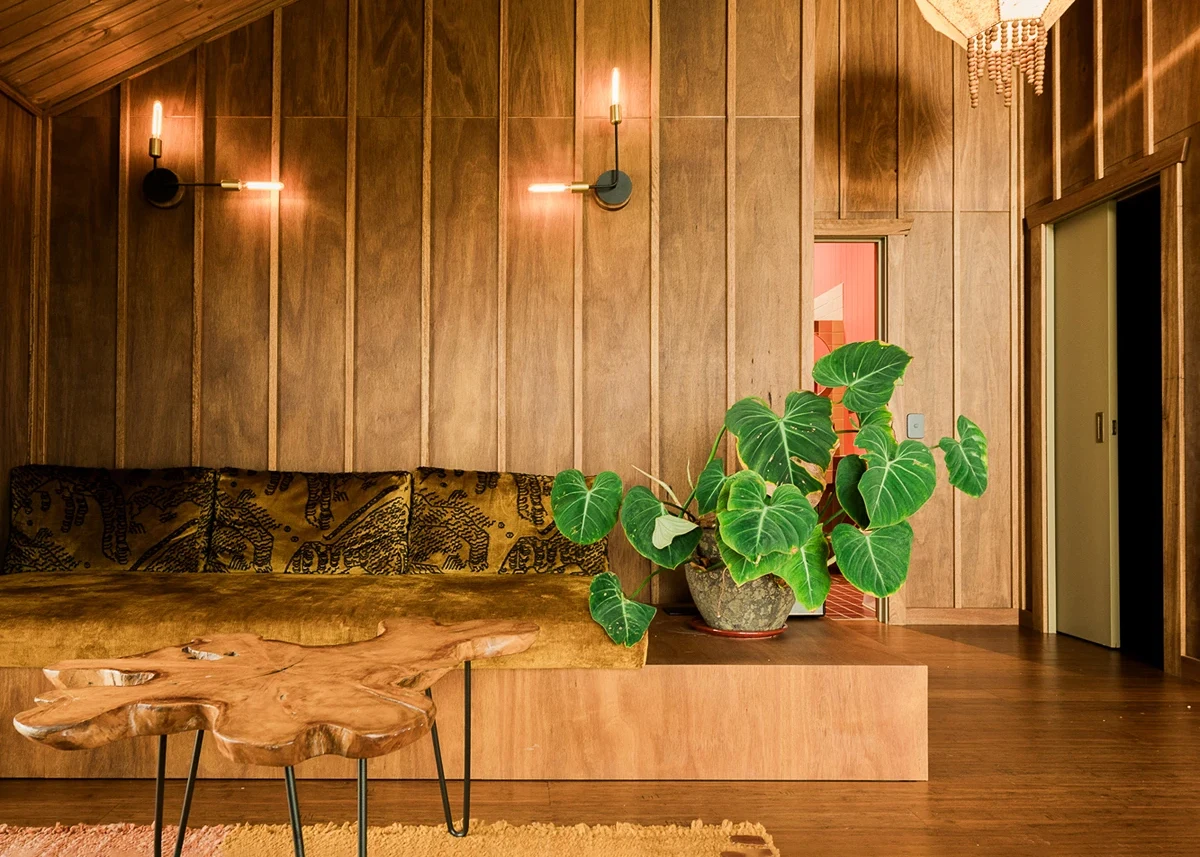
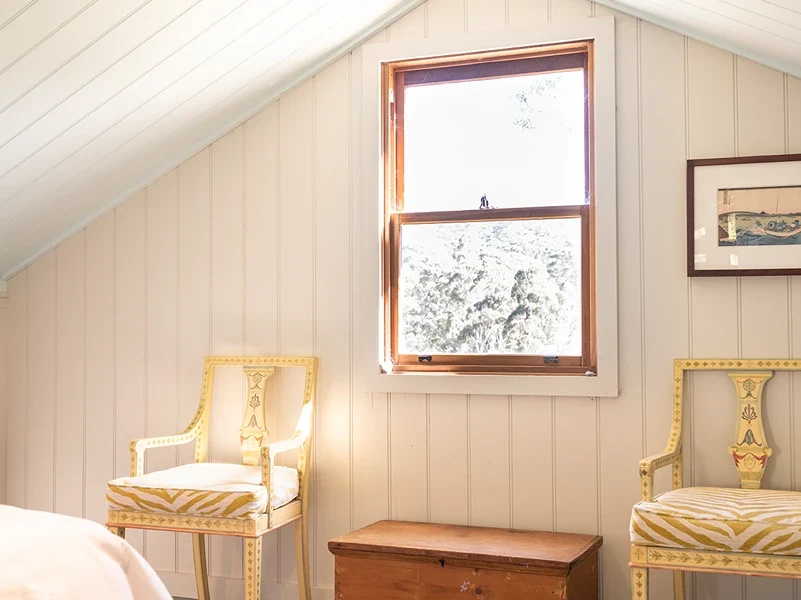
7. Timber Panelling – Classic Warmth and Versatility
Timber panelling is a timeless way to bring warmth, texture, and natural character to your garden room, studio, or cabana. Whether you want a refined classic look or a striking feature wall, timber panelling offers endless design possibilities and adapts well to various styles.
This wall lining option not only looks stunning but also improves insulation and acoustics, making your space cosy and inviting. You can choose from a range of timber types, finishes, and installation methods to perfectly suit your aesthetic and functional needs.
| Great for | Less suited to |
|---|---|
| Classic, rustic, Scandi, coastal or modern designs | High moisture zones, unless properly treated |
| Cabins, cottages and retreats | Tight budgets without using engineered timber |
| Spaces needing tactile warmth and texture | |
| Natural insulation and soundproofing |
| Pros | Cons |
|---|---|
| Brings natural warmth and texture to interiors | Can require regular maintenance and ongoing care, especially in humid areas |
| Durable, long-lasting and sustainable | Often more expensive than plasterboard or ply alternatives |
| Can be painted, stained, or left raw to highlight grain | Installation is often more labour-intensive |
| Helps improve room acoustics and insulation | Colour and grain variations may require careful selection |
| Wide variety of timber species and panel profiles available | Price can vary with species |
| Suits multiple design aesthetics and styles |

Timber Panelling Design Inspiration
Modern Linear Elegance::Opt for narrow, vertical timber strips in a light natural finish to create a sleek, Scandinavian-inspired backdrop. Pair with minimalist furniture and black metal accents for a fresh, airy feel. Perfect for studios or home offices where clean lines matter.
Rustic Cabin Charm:Use wide, rough-sawn or shiplap boards stained in deep walnut or black to create a warm, inviting Nordic cabin atmosphere. Add cosy textiles, soft lighting, and handcrafted furnishings for maximum comfort.
Coastal Calm: Use whitewashed or soft grey timber panelling to evoke a breezy, seaside charm. Pair with rattan light fixtures, white or sage accessories, and light timber furniture to create a relaxed, airy retreat. Ideal for coastal barn homes and garden rooms that double as guest escapes.
Feature Wall Drama:Create a statement by panelling a single wall with reclaimed timber or mixed widths and finishes. This adds visual interest and a touch of sustainability to your space, ideal for living spaces or creative rooms.
Horizontal Flow: Install timber panelling horizontally to elongate a room visually. This works well in compact garden rooms or sheds, enhancing the sense of space while maintaining warmth.
Tips for Working with Timber Panelling
- Select sustainably sourced or reclaimed timber to align with eco-friendly goals
- Use clear matte sealants for natural-looking but protective finishes
- Choose tongue-and-groove or shiplap profiles for easy alignment
- Mix board widths, profiles or species, or alternate directions for visual interest and texture
- Pre-cut and label all panels before installation for speed and efficiency
Final Thoughts
When it comes to creating your dream space, wall linings are more than just a finishing touch – they set the tone, influence comfort, impact functionality and contribute to the overall personality of the room. From bold industrial backdrops to classic timber warmth and practical pegboard solutions, there’s a lining to suit every lifestyle, design vision, and budget.
By choosing your wall finish with intention, you’re not just building a room – you’re shaping how it looks, feels, and functions for years to come.
Want some new walls to line?
Download our Design Price Guide and get started.
Already downloaded our Design Price Guide and ready to take the next step?
Let’s meet. Book a callback from one of our friendly team.